
Picking up a puncture and having to change a wheel at the side of the road used to be a rite of passage for drivers. It’s a relatively straightforward task if you know what you’re doing and you’re familiar with whatever tyre rescue equipment is tucked away in your boot. A full size spare wheel or a space saver is one thing but what if your car only has a puncture repair kit to get you out of trouble? The prospect of using one fills many people with horror, but it needn’t.
For those who aren’t prepared to take on the challenge, either because they’re quite reasonably nervous of working at the side of a busy road or simply don’t want to risk greasy hands or a broken nail, then breakdown companies like the AA or Green Flag are often the go-to solution. But what if you want or need to do the job yourself? This guide to using your car tyre puncture repair kit is here to help.
What is a car tyre puncture repair kit?
Advances in tyre technology and improved road surfaces have over the years reduced the frequency of punctures, but they’re still a relatively common occurrence. However, while larger cars and SUVs may often carry a full-size spare, many motorists are driving around with temporary space-saver wheels and tyres, while plenty of manufacturers no longer fit spare wheels at all to certain models.
Instead, digging around under the boot floor will reveal a canister of ‘gunk’, usually accompanied by a pair of disposable gloves, and sometimes by a portable compressor that plugs into your car’s accessory power socket/cigar lighter. Welcome to what your car’s handbook will optimistically refer to as ‘The Puncture Repair Kit’.
We say optimistically because, although in very many cases a puncture repair kit can be a godsend that gets you out of trouble fast, in a significant proportion of punctures a can of sealant simply won’t be up to the job. Even when a tyre sealed and re-inflated at the roadside does hold air, it’s only a temporary fix and it’s then imperative to get the tyre off the car and repaired professionally as soon as possible.
At this point many tyre fitters will tell you they can’t repair a tyre you’ve just filled with sealant, forcing you to buy a new replacement. This may or may not be the straightforward truth, but is often company policy amongst the big repairers.
So if puncture repair kits are a mixed blessing, why are they supplied as standard on so many cars? The most likely reason is saving weight, as a hefty wheel and tyre can make a small but appreciable difference to fuel efficiency and CO2 figures, and manufacturers have targets to meet.
If you don’t want to rely on a puncture repair kit, there’s nothing stopping you from demanding a spare wheel or space-saver when you buy your next car. Most cars will already have a spare wheel storage well in the boot, so it’s often a simple matter of swapping out the repair kit – although a proper spare is likely to be an extra cost option.
That said, drivers who do have a proper spare wheel, may equally choose to pick up a can of tyre repair foam or sealant from their local car accessory store. That way they’ll be covered for all eventualities too.
Step-by-step guide to using a puncture repair kit
Be safe
It might be relatively quick and easy to use a puncture repair kit or a can of tyre foam, but that shouldn’t encourage you to be a risk-taker. If you’ve stopped with a puncture in a busy or dangerous spot, it’s often safer to drive slowly to a spot where you can pull off the road safely. A ruined tyre or buckled alloy wheel might be more costly to repair, but it might save your life.
The police and breakdown organisations such as the AA or Green Flag advise that you should never attempt to repair or change a tyre on the motorway hard shoulder. Get everyone out of the car and behind the barriers, then call for help.
Get prepared
If you’ve stopped near a road, it’s usually advisable to make sure all passengers are out of the car and standing safely away from potential traffic hazards.
- Switch off your engine and apply the handbrake.
- Turn on your hazard lights
- Wear a high-visibility jacket if you have one
- Open boot to retrieve your puncture repair kit.
- Deploy your warning triangle behind the car at a suitable distance – if it’s safe to do so.
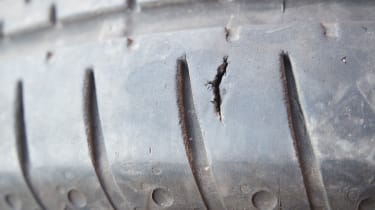
Inspect the puncture
Not all punctures can be repaired by tyre sealant. If any of the following apply, then you’ll need to call your breakdown service for professional help:
- The tyre is obviously cut up or disintegrating.
- The puncture hole itself is greater than 4mm.
- The puncture is on the tyre shoulders or sidewall – not the main tread.
- Your wheel rim shows obvious damage that prevents the tyre seating properly
Insert sealant/re-inflate tyre
You may have already had to drive the car backwards or forwards by a few inches to rotate your flat tyre and make a puncture visible for inspection. If you’re satisfied there’s no serious damage, these basic rules apply when attempting to seal a tyre using tyre foam products or a puncture repair kit:
- Carefully read the instructions on the can, or in your vehicle handbook.
- Rotate the wheel so the puncture is at the top. Ideally the valve should be as high as possible too, but obviously that’s not always possible.
- Connect the sealant container to the tyre valve and insert the sealant.
- With pressurised ‘all-in-one’ cans, the sealant will be pushed into the tyre as the tyre simultaneously re-inflates.
- If you have a separate compressor you may need to squeeze sealant into the tyre before connecting the compressor to re-inflate the tyre.
- Some systems require you to connect the compressor to the sealant container, while the container is connected to the tyre valve.
- Other systems require you to remove the tyre sealant container and connect the compressor directly to the tyre valve.
- Plug in the compressor to your car’s 12V accessory socket and inflate your tyre to the correct pressure – as per the handbook. (The compressor should have an integrated gauge or meter.)
Driving after using a puncture repair kit
Once you’ve attempted to re-inflate the tyre, you should have a pretty good idea straight away as to whether the repair kit has a chance of working. If there’s sealant leaking fast out of the tyre, you’ve no chance, and you might as well ring for help right away.
If the tyre appears to be holding some pressure you’re looking good. However, most kits require you to drive on it for a couple of miles in order to spread the sealant around and to properly address the leak, so that’s the next task.
Stop somewhere safe after the required distance, and have another look at the tyre. If the sealant has worked you may still have lost some air during the process, so if you have a compressor you should check the pressure again and re-inflate as necessary.
If you’ve used a pressurised can of tyre foam, then all you can do is reassure yourself visually that the tyre is holding air and drive to a garage or tyre specialist.
Replacing your tyre sealant canister
If you’re driving a car with a compressor and sealant canister type of puncture repair kit, you’ll need to replace the sealant you’ve used. This can be bought over the counter at your local dealership, or you may be able to save a few pounds buying it online.
Either way, if you forget or don’t bother, it’s sod’s law you’ll pick up another puncture the following week.
General tips on car tyre punctures
Can you avoid getting punctures in the first place?
While it’s impossible to avoid every scenario where you might pick up a puncture, looking after your tyres properly makes a great deal of sense.
Often, a tyre that loses pressure suddenly at speed while driving will have been leaking air slowly for some time in advance. You may think you’ve just had a puncture, but a stone or nail may have been embedded in a tyre for days or weeks previously. Over time the movement of the tyre against tarmac can exacerbate damage until a total loss of pressure suddenly occurs. So check your tyres regularly for pressure, and inspect the treads for foreign objects whenever you can – it’s hassle, but you can save yourself a deal of trouble.
All too often these days it’s potholes that cause punctures, so be observant for potential road surface issues and drive at speeds that allow you to take avoiding action if required.
Likewise, try to avoid banging your tyres up and down kerbs while parking, as that’s a surefire way to damage tyre walls and rims – and an invitation to a puncture.
Can you use tyre foam or sealant as a preventative measure?
Some tyre foam and sealant products are marketed as puncture preventers, but if you’re going to rely on them you need to take special care.
It’s possible, for example, that a tyre filled with pre-puncture sealant will effectively prevent the initial slow loss of pressure that’s so often an indicator of a major failure to come. So if a sharp object becomes lodged in your tyre you may not notice until it’s worked deeper into the rubber and potentially caused a more catastrophic tyre failure.
The only way to mitigate against this scenario is more regular and rigorous visual inspections of the tyre tread.
Why won’t tyre firms repair sealed and re-inflated tyres?
It’s not true that you can’t repair a tyre that’s been sealed with tyre foam, and some tyre repair specialists may be prepared to take on a repair for you. However it’s a messy and time-consuming job to clean all the sticky goo out of the tyre when it’s off the wheel, and most tyre fitters won’t do it.
They justify this stance by pointing out a tyre that’s not properly cleaned may have hidden further damage. There’s truth to this too, because repairing one hole may not solve your problems if there’s another sealant-filled leak that’s accidentally overlooked. This could cause a dangerous blow-out further down the road.
Another problem is that if you’ve driven lots of miles at low pressure, you may have caused hidden damage to the structure of the tyre.
If you are sure there is only one area of damage, and you haven’t been driving around on a flat, then you do have the option of ringing round the smaller local tyre-fitters in your area. You may turn up someone prepared to take on a repair.
Confused by all those numbers and letters on the side of your tyres? Read our helpful tyre speed rating guide that covers all you need to know…